Summer Camp
Plumbing Winterization:
23 October 2023
Reference Video: How to Winterize a Cabin 35 min by David Patrick
- Purchase 1-2 gallons of RV Anitifreeze, often pink in color. RV Antifreeze (ethanol and propylene glycol) is non-toxic and appropriate for
living space applications. By contrast, Automotive Antifreeze (ethylene glycol) is toxic and should not be used in camps, RV's, boats,
etc.
- Electric - Power Down the following:
- Jet Pump - Unplug power cord in Pumphouse
- Ultraviolet Filter - Unplug power cord in Pumphouse
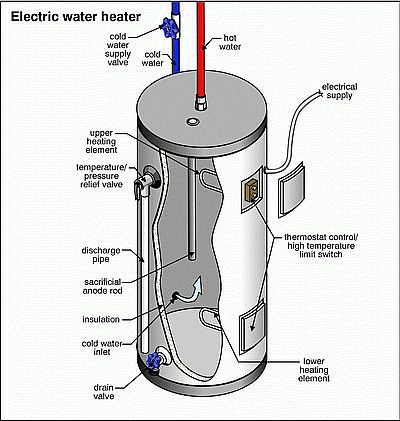
- Hot Water Heater - Switch Off at Camp breaker box
- Drain Hot Water Heater:
- Power Must be Off (Step 2). If not, Heating Element(s) melt and will require replacement.
- Attach Garden Hose to HWH Drain Valve (spigot at base) and drag other end of hose outside downhill from the unit.
- Turn the HWH Cold Water Supply Valve Off. Note this is unnecessary because the Jet Pump is off (Step 2), and the valve should be left Open for the winter.
- Open HWH Drain Valve.
- Open HWH Pressure Relief Valve,
- Channel Clapton and Let It Drain.
- Open Lowest Pumphouse Drain Valve - Garden Spigot located between UV Filter and Pressure Tank.
- Open Lowest Camp Drain Valve - 1 per camp. Gravity will drain water from camp plumbing when faucets are opened in step 6 below. Locations:
- Unit 1 - 2 valves under the kitchen sink.
- Unit 2 - Supply Line where it daylights at east wall.
- Unit 3 - Supply Line where it daylights vertically at east wall.
- Open all camp Faucets, Sinks, Showers, Outdoor Spigots - Any fixture water comes out of. HWH and Toilet supply
valves remain open.
- Remove all Shower Heads, placing them where you can find them next spring.
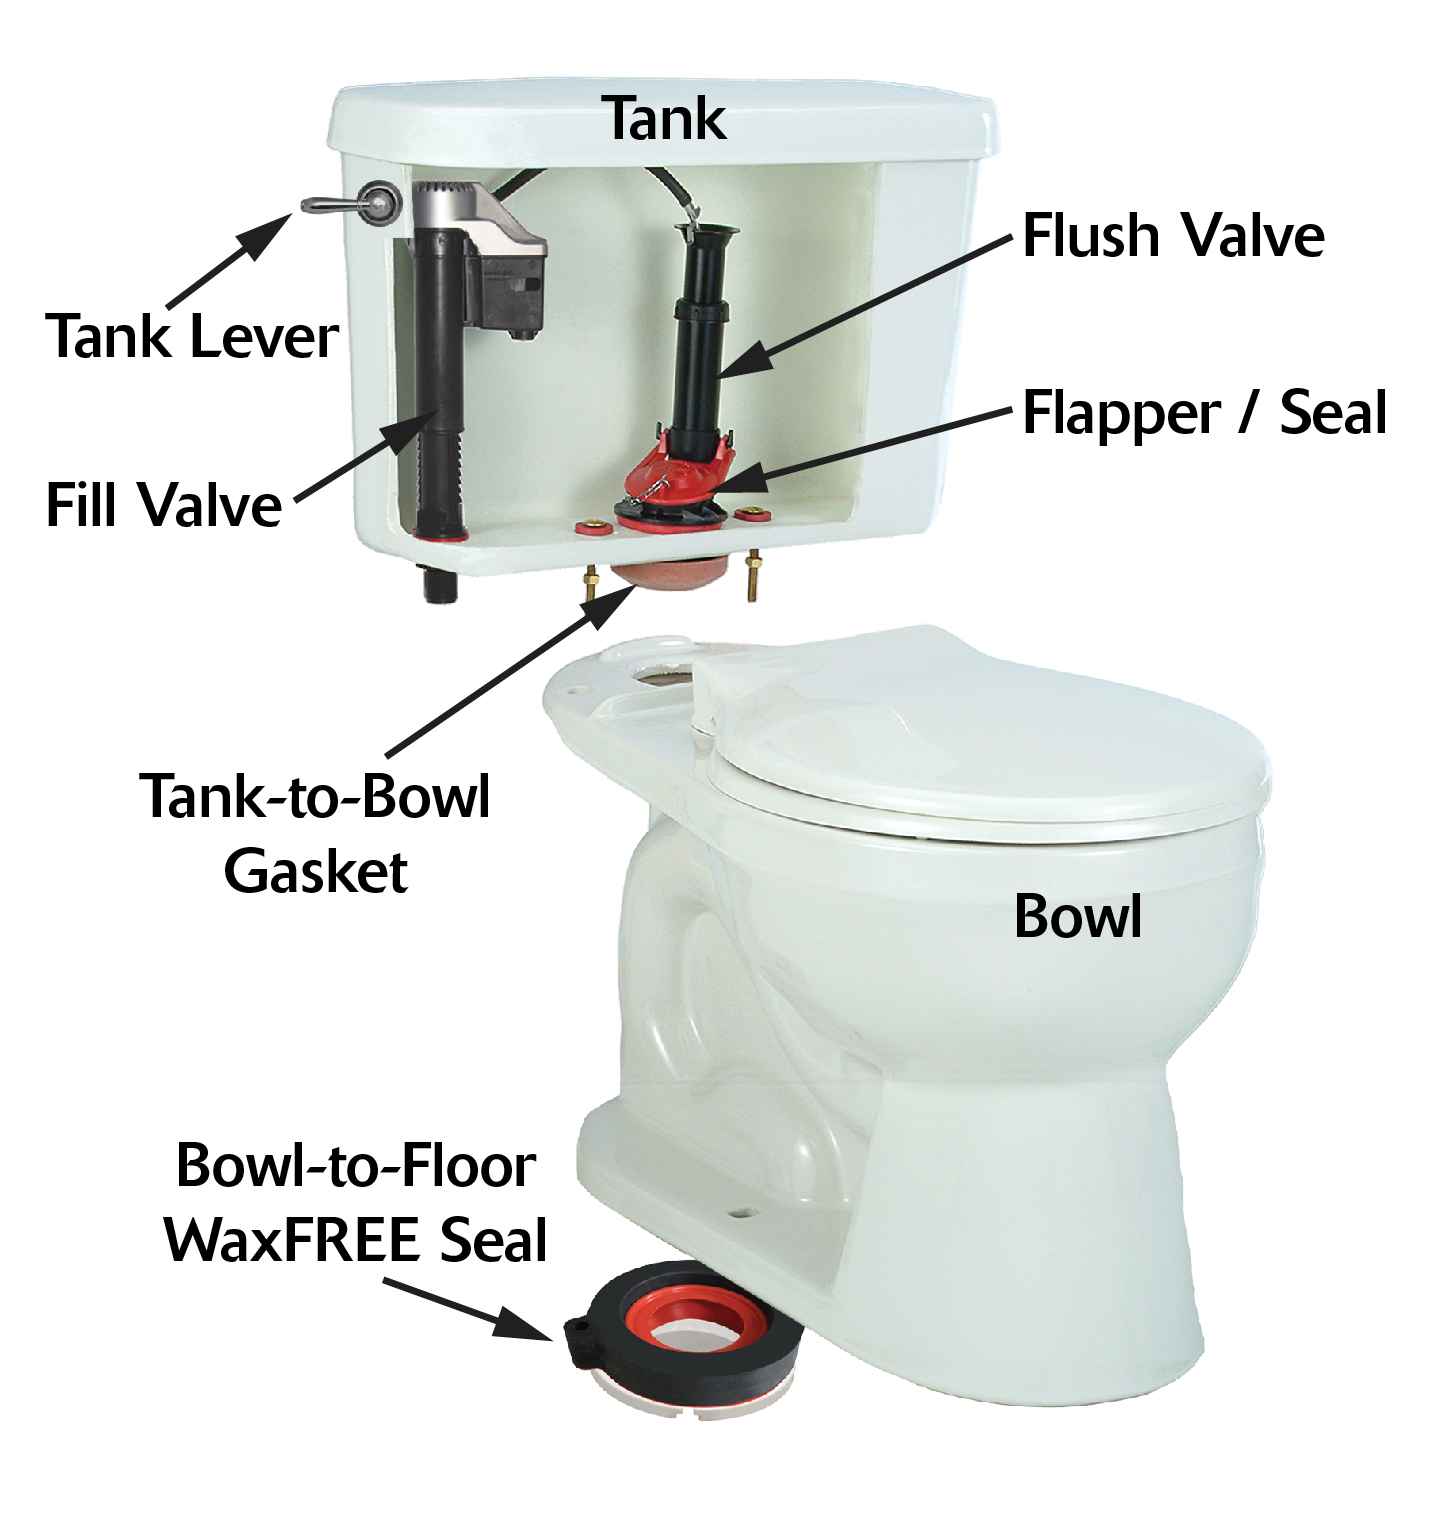
- Toilet:
- Sponge the Tank dry.
- Sponge the Bowl dry. Squeamish individuals may instead Flush the toilet (it will not refill much), and Pour Antifreeze into the bowl.
- Pour RV Antifreeze down the Flush Valve Flapper drain. This is to keep any water still in the trap from freezing. If antifreeze
is simply poured into the Tank, flush the toilet to fill the trap.
- Blow out Pipes with an Air Compressor for Assurance:
- Set the Compressor Pressure Maximum to 40 psi or less to avoid any plumbing damage.
- Close Camp Water Supply Line Valve, located at each camp (opened in step 5 above).
- Go around to each faucet and shower and blow air with the compressor nozzle down each faucet and shower supply line. Make the best seal possible with your hand.
- Get someone to watch the Lowest Camp Drain Valve (Step 4) for water or mist discharge. If no one is available, place
a bucket under the drain valve and check that.
- Blow out the 2 Supply Lines from the Pumphouse:
- Units 1 and 2:
- Open Unit 1 and 2's Camp Water Supply Line Valve in the Pumphouse.
- Close Unit 3's Camp Water Supply Line Valve in the Pumphouse.
- Open the Lowest Pumphouse Drain Valve (Garden Spigot in Step 4).
- Attach the air compressor to the Lowest Pumphouse Drain Valve and blow air through Unit 1 and 2's Supply Line.
- Note: While one line serves both camps, valve set up at Unit 1 makes it impossible to isolate Unit 1 from 2 for blowing out the line. So valves need to be repositioned to drain the supply line reliably.
- Get someone to watch the other end of the Supply Line at Unit 2 for discharge or use a bucket to capture discharge.
- Unit 3:
- Close Unit 1 and 2's Supply Line Valve in the Pumphouse.
- Open Unit 3's Supply Line Valve in the Pumphouse.
- Close the Camp Water Supply Valve above the Lowest Camp Drain Valve (Step 5).
- Open Lowest Camp Drain Valve and attach the air compressor to it.
- Blow air down the Unit 3's Camp Water Supply Line toward the Pumphouse.
- Get someone to watch the the Lowest Pumphouse Drain Valve in the Pumphouse (Garden Spigot in Step 4) for discharge or
use a bucket to capture discharge.
- Units 1 and 2:
- Pour RV Antifreeze into outfall traps under sinks and showers to keep any remaining water from freezing. Antifreeze went into the Toilet
at Step 8(c).
- When done, make sure all valves, faucets, spigots, drains, etc, are left Open for the winter.